#314 – log4shell and PeopleTools

The PeopleSoft Administrator Podcast hosted by Dan Iverson and Kyle Benson

On this early release episode, Kyle and Dan talk about the log4shell vulnerability and how to mitigate the risk for PeopleSoft.

Show Notes

Apply CPU Patches with Deployment Packages

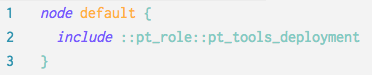
We have talked on the podcast about different ways to apply CPU patches, but with the DPK we have another tool to help us quickly apply CPU patches. This post and video demo’s will show you how to use the DPK to quickly apply CPU patches to your servers.

Deployment Workflow

When you run the DPK, it will deploy WebLogic, Java, Tuxedo (and more) on your server. The DPK uses archives (also known as “tarballs”) of prepackaged installations and extracts those archives to your server. There is one big problem, the archives included in the DPK’s do not contain the latest security patches. So, let’s make our own tarballs that include the security patches to deploy. This process is also a great exercise to better understand how the DPK deploys software.

If you are on Linux you can use the patching functionality with the DPK, but that code has not been written for Windows. I’m not covering that feature in this post, but the DPK Install Guide has a section on using that functionality (Task 6-3-1: Using the DPK Setup Script to Apply Fixes).

Movement Scripts

There are Fusion Middleware scripts the DPK uses to deploy WebLogic and Tuxedo. (Thanks to Eric Bolinger for pointing me in this direction.) The movement scripts allow you to take a current install of WebLogic, package it up, and deploy it to additional servers. This is how the DPK deploys WebLogic. The PeopleTools team packages up a WebLogic installation and we deploy that install to our servers. The movement scripts also manage the Oracle Inventory file for you.

There are many parts to the movement scripts, but we’ll be using just one part: copyBinary. This script will take a current installation and create a .jar file from that installation. We’ll use copyBinary to package our patched WebLogic installation.

If you have errors with the pasteBinary.cmd on the target system, you may need to configure the $ORACLE_HOME\oui\oraparam.ini file. This is a configuration file used by the OUI software. To make this simple, I copied the settings in the current $BASE\dpk\archives\weblogic12.1.3.0.tgz to my $ORACLE_HOME\oui\oraparam.ini using Beyond Compare. (Yes, Beyond Compare can read inside a tarball and compare against a directory!) Then I recreated my tarball with the updated oraparam.ini file.

Create a Patched WebLogic Tarball


Next, it’s time to install the CPU patch and run the copyBinary.cmd script. Stop all your PIA services on the server so you can remove the existing installations.

First, let’s patch Java. For demonstration, I’m using the jdk-7u141-windows-x64 installer. I’m installing

Then, we’ll use OPatch to apply the CPU to WebLogic:

cd $PATCH
$env:ORACLE_HOME=e:\psoft\pt\bea
$env:ORACLE_HOME\OPatch\OPatch napply

Once OPatch is done, we’ll use the movement scripts to package up our installation.

$env:JAVA_HOME=e:\psoft\pt\jdk1.7.0_141
. ${env:ORACLE_HOME}\oracle_common\bin\copyBinary.cmd -javaHome ${env:JAVA_HOME} -archiveLoc ${env:TEMP}\pt-weblogic-copy.jar -sourceMWHomeLoc ${env:ORACLE_HOME}

The output file from this command needs to be named pt-weblogic-copy.jar. The DPK expects that is the name of the .jar file. Next, we create a tarball of the pt-weblogic-copy.jar and two files to do the deploy portion of the movement scripts: cloningclient.jar and pasteBinary.cmd. These movement scripts are used by the DPK to deploy WebLogic. I used 7-zip to create my tarball with these three files:

$env:WL_VERSION="12.1.3.170418"
7z a -ttar "${env:TEMP}\pt-weblogic${env:WL_VERSION}.tar" "${env:ORACLE_HOME}\oracle_common\jlib\cloningclient.jar"
7z a -ttar "${env:TEMP}\pt-weblogic${env:WL_VERSION}.tar" "${env:ORACLE_HOME}\oracle_common\bin\pasteBinary.cmd"
7z a -ttar "${env:TEMP}\pt-weblogic${env:WL_VERSION}.tar" "${env:TEMP}\pt-weblogic-copy.jar"

Last, we gzip the archive and drop it in the $BASE\dpk\archives folder:

$env:DPK_BASE="e:\psft"
7z a -tgzip "${env:DPK_BASE}\dpk\archives\pt-weblogic${env:WL_VERSION}.tgz" "${env:TEMP}\pt-weblogic${env:WL_VERSION}.tar"

One thing to note here – the DPK doesn’t handle multiple versions of software in the dpk\archives folder well. So, only have one pt-weblogic* file in there.

For Java, we don’t need to use the movement scripts. We’ll simply tarball up the new directory and include that in our $BASE\dpk\archives folder.

$env:JDK_VERSION="1.7.0_141"
7z a -ttar "${env:TEMP}\pt-jdk${env:JDK_VERSION}.tar" $env:JAVA_HOME\*
7z a -tgzip "${env:DPK_BASE}\dpk\archives\pt-jdk${env:JDK_VERSION}.tgz" "${env:TEMP}\pt-jdk${env:JDK_VERSION}.tar"

Deploy CPU Patches


Copy your updated tarballs to a new server. You’ll want to remove the existing tarballs from the $BASE\dpks\archive to prevent the DPK from raising an error.

We have two options for telling the DPK we want to install WebLogic. The first option is to delete the existing WebLogic and Java folders. If you stop your PeopleSoft domains, you can delete both folders. When you run the DPK it will see that WebLogic and Java are missing and reinstall them from the patched tarballs in the $BASE\dpk\archives folder.

The other option is use the redeploy: true flag in psft_customizations.yaml. If you set the redeploy variable to true, the DPK will redeploy all the software in your $BASE\dpk\archives folder. This option requires less work – set a variable in psft_customizations.yaml and run the DPK – but it can take longer because you will redeploy Java, Tuxedo, WebLogic, PS_HOME and more. I think of this option as “the Puppet way”.

For this post and demo, we’ll use the redeploy: true option in our psft_customizations.yaml file. We’ll also use one other trick for testing; we will only run the part of the DPK that handles the middleware. Instead of running the entire DPK that touches the OS, middleware, and domains, the manifest we call includes only the DPK role that ensures the middleware is installed and not touch other parts of the system. This will also speed up our CPU patch deployment.

middleware.pp

Let’s create a new file under c:\programdata\puppetlabs\puppet\etc\manifests called middleware.pp. You can start by cloning the site.pp file. Change the file to look like this:

node default {
  include ::pt_role::pt_tools_deployment
}

Save the file. That’s it!

What we have done is tell Puppet to only run the DPK role pt_tools_deployment instead of running a larger role like pt_hcm_pum.

In the video demo, we are applying patches to a PeopleSoft Image, which is a Fulltier setup. The default pt_tools_deployment.pp manifest won’t run on a Fulltier system. To get around that, I created a copy of pt_tools_deployment.pp manifest called io_tools_deployment.pp and removed the check on env_type: fulltier.

cpu.ps1

We have a few tasks to do before we can run the middleware.pp manifest. We’ll wrap those tasks in a Powershell script we can run on each server.

At a high level, here are the tasks our cpu.ps1 script will do:

  1. Copy new DPK archives to server
  2. Stop PeopleSoft Services
  3. Remove current Java and WebLogic installs (if redeploy: false)
  4. Run middleware.pp to install patched Java and WebLogic
  5. Start PeopleSoft Services

Get the Sample Code

The full code is in the ps-dpk-tarballs GitHub repository. You can find all the scripts from this post and demo on GitHub.

Monitoring WebLogic and Java

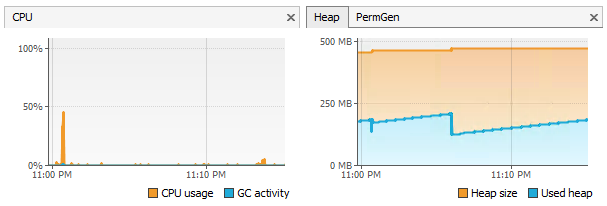
Lately, I have had interest in monitoring WebLogic’s performance. Since Weblogic is built on Java, there are some standard tools we can use to look into the Java Virutal Machine (JVM). We’ll cover two of those tools in this post: JConsole and VisualVM. Both JConsole and VisualVM are included in the Java Development Kit so they are already on your server. These tools will give you information about the JVM used to run WebLogic and can help you tune you web servers.

JMX

To get monitoring data out of WebLogic’s JVM, we need to enable JMX. Java Management Extensions (JMX) is a monitoring technology built into Java. Applications that run on Java can build instrumentation into the application to provide performance data about the application. Even without additional data, the JVM will provide CPU, Memory, Thread and other stats about the heap.

To enable JMX for WebLogic, we’ll update the setEnv.cmd or setEnv.sh file. At the end of the JAVA_OPTIONS line, add these flags:

-Dcom.sun.management.jmxremote -Dcom.sun.management.jmxremote.port=8888 -Dcom.sun.management.jmxremote.ssl=false -Dcom.sun.management.jmxremote.authenticate=false

There are 4 flags we pass to Java when the JVM is started:

  1. Enabling JMX Remote connections
  2. JMX Remote Port
  3. Requiring SSL Connections
  4. Authentication for JMX

For testing, I’ve turned off SSL and Authentication, but if you are enabling JMX across all your servers I recommend you turn both options on. For the JMX Port, pick a port value that is unique for each instance of the JVM. Each WebLogic and App Server instance will have its own JVM. For more information on configuring JMX, this is a link to the official documentation.

If your are on Windows and updated the setEnv.cmd file, you will want to re-install the Service that starts the PIA domain. The JAVA_OPTIONS parameters are stored in the registry when you create the service. If you update setEnv.cmd, you need to recreate the service (or manually update the registry).

Now that JMX is enabled on our domains, let’s look at a few tools to help us monitor our JVMs.

JConsole

JConsole is a utility included with the JDK download. Under JAVA_HOME\bin you’ll find jconsole.exe To start, we’ll run JConsole from our web server where we enabled JXM (instead of our desktop). Open JConsole and it will ask you to connect to a JMX Process. You have two options: Local Process and Remote Process. We’ll use the remote process option and use these values to connect to our web server: localhost:8888. We don’t need a username or password since we passed the flag jmxremote.authentication=false.

jconsole01

After connecting, you’ll get a message asking about your insecure connection. Click “Insecure” to continue. On the main page, we see 4 graphs related to the JVM.

jconsole03

These graphs give you a good overview of the JVM status. The CPU graph will show you how much of the CPU that JVM is using, and the Threads graph gives a good indication of workload on the JVM. The best part of JMX is the Memory graph. Getting your JVM Heap sized correctly can make a big different in performance. The graph should follow a pattern when Garbage Collection runs.

jconsole04

You don’t want Garbage Collection to run too often, or the usage too high after Garbage Collection. This graph helps with getting the right size for your web server. (You can find more tuning information here.)

VisualVM

VisualVM is another untility included with the JDK download and is also under JAVA_HOME\bin. We’ll start VisualVM on the server as well by running jvisualvm.exe --console new.

visualmv02

When VisualVM opens, we create a new connection by right-clicking on “Local” and selecting “Add JMX Connection”. Fill in the port number and select “Do not require SSL connection”.

visualvm03

VisualVM show us similar data as JConsole, but I think it looks a nicer. Under the Monitor tab, you can also force the JVM to run a Garbage Collection. For the most part, these two applications are similar.

visualvm03b

Remote JMX Connections

We have run both applications on the server to connect to JMX, but these applications are more useful if we can connect to the servers remotely. By default, JMX will only accept local connections. To enable remote connections to JMX, we have to pass this flag:

 -Dcom.sun.management.jmxremote.local.only=false

After you add that parameter to your setEnv.cmd JAVA_OPTIONS line, restart the web server. On a different computer or server, launch VisualVM or JConsole. Create a remote connection to JMX on the server. In the Connection box, enter the server name and port for the JMX instance.

visualvm05

JMX Authentication

Once you get the basic configuration in place, you want to enable authentication to connect to the JMX instance. The default JMX authentication is stored in the JDK folder. That will affect all domains using the JDK folder. Instead, we will use a JMX password file for each web server domain.

  1. Open the file JAVA_HOME\jre\lib\management\jmxremote.access.
  2. Add the line psMonitor readonly to the bottom of the file and save. This line adds a new user named psMonitor and a read-only account to any JMX instances using this JAVA_HOME.
  3. Copy the file JAVA_HOME\jre\lib\management\jmxremote.password.template to PS_CFG_HOME\webserv\jmxremote.password.
  4. Open the new jmxremote.password file.
  5. Add the line psMonitor test123 to the bottom of the file and save. This line sets the password for the psMonitor user. To give each web server domain a different password, set a unique password in this file under each PS_CFG_HOME.
  6. Open the setEnv.cmd file and add these parameters:

    -Dcom.sun.management.jmxremote.password.file=PS_CFG_HOME\webserv\jmxremote.password -Dcom.sun.management.jmxremote.authenticate=true
    
  7. Restart the web server for the new paramters to take affect.

Now that we have a web server configured to run JMX with authentication, we will create another connection in VusualVM to use the username and password.

  1. Right-click on the remote server and select “Add JMX Connection”
  2. Enter the server name and port.
  3. Enter psMonitor for the Username and test123 for the Password.
  4. Select “Do no require SSL connection”
  5. Click OK.

jmxauth01

jmxauth02

Script WebLogic and Java Patches

In December, we talked quite a bit about patching Java and WebLogic on the blog and podcast. There was a WebLogic CVE, and then a patch, to apply. If you want a recap on the CVE and patching process, here are the posts:

While applying the patches, I wanted to script the process so patching would be consistent across all our servers. I pulled the scripts into a GitHub project for sharing and reuse. If you haven’t scripted a WebLogic patch, this would be a place to start. The scripts use PowerShell and built for WebLogic 10.3.6. So, they use SmartUpdate instead of OPatch. I also added in a Java patch to the process too. You could pull out the Java patch script to use by itself. One more note: all the patches, Java, and scripts were set to run from the folder e:\installers\weblogic1036-2015-CVE-Patches. If you use these for your environment, or just use them as a template, you’ll want to update those paths for your specific configuration.

There is nothing ground-breaking about these scripts 🙂 I can write scripts, but I’m not the best script developer out there. If you see places where the scripts need improvement, file an issue with the project or submit a pull request! The main goal with this project and post is to get others started with scripting. Scripting, even if the scripts are basic, can benefit administrators. I hope that this quick overview might help someone get started.

Scripts Overview

These scripts are writtin in PowerShell. If PowerShell scripts are not enabled on the server, run this command to allow PowerShell scripts to run:

set-executionpolicy unrestricted

  1. Install new SmartUpdate version (3.3.0)

    installSmartUpdate.ps1

    The silent.xml file is used for a silent install (no prompts). The installation directory is set to e:\oracle. If you want a different directory, change the value for “BEAHOME”. 1. Stop all web servers running on the server .stopPIAServices.ps1 The script looks for any Windows service that containts “*-PIA” in the name. If you have any WebLogic domains were not created by the

    installNTService script, you may need to shut them down by hand.

  2. Prepare and copy files from the weblogic1036-2015-CVE-Patches folder

    prepareFiles.ps1

    This script performs tasks to prepare different files for patching: On our servers, two files needed updates to run the Smart Update utility. registry.xml needed to remove a reference to Tuxedo; bsu.cmd needed an increase in memory to the Java Heap. The registry.xml file also contains a reference to the server where it was installed. The script will change that value based on the new server’s name. The original files are backed up first and a .bkp extension is added to the file name. The script also copies jdk-1.7.0_79 to our e:\java folder. If you want the new java version in a different location, you can change the path in the file.

  3. Apply both WebLogic patches The patches we are applying resolve the December 2015 CVE with WebLogic. If you are using these scripts for future patches, you’ll want to update the patch ID’s in the script.

    applyWebLogicPatches.ps1

    Both patches are applied to WebLogic using the bsu command. The script assumes your patches are in the folder e:\patches\cve-2015-4852. NOTE: On one of our servers, the second patch stalled during the “Checking for Conflicts” step. If the script stalls for more than a few minutes, hit Cntl-C.

  4. Update the JAVA_HOME values

    updateJavaVersion.ps1

    The JAVA_HOME value in the setEnv.cmd script will be updated to the new path. You must update this script for each server. The paths in the script are hard-coded. (The hard coding is an obvious candidate to fix next. Should be able to use the Get-ChildItem cmdlet to find all the setEnv.cmd files.)

  5. Update Registry value for JAVA_HOME

    updateRegistryJavaVersion.ps1

    The JAVA_HOME value in the Registry for each web service will be updated. You must update this script for each server. The paths in the script are hard-coded. (Again, another place for improvement. Need to find a search cmdlet for the Registry. Could look for -PIA in the service name.)

  6. Start all web servers running on the server.

    startPIAServices.ps1

    Again, this looks for all Windows services that have *-PIA in the name and starts them. That’s it.

The scripts are pretty simple, and you can write a wrapper script to run all the sub-scripts. That way you’d have one script to kick off. Or, you could add these into a tool like Rundeck to execute from a centralized place. Once you start down the path of scripting, many opportunities open up to speed up everyday tasks.

How to Patch Java in WebLogic

With the recent attacks on SSL, WebLogic and Java, I wanted to give an overview on how you patch Java for your WebLogic instances.

When you install WebLogic, it asks you for the location of your Java Home. Then, every web server instance you create uses that Java Home. Unless you have patched Java in the past, all of the WebLogic instances on that server will be using the old Java Home.

Download the New JDK

Go to Oracle’s Java Download page and download the latest JDK. Make sure to select the correct codeline that your version of PeopleTools supports.

PeopleTools 8.53-8.55 support Java 1.7 (aka Java 7). It will implicity support any patch on the 1.7 codeline. So, you can install the latest 1.7.0_xx patch and use it with WebLogic and PeopleTools.

Install the new JDK (you don’t need the JRE) to a common location. We use the folder convention e:javajdk-1.7.0_xx to install the JDK.

Update the commEnv Script

By default, the Java Home parameter is set in the %WL_HOME%commEnv script. This script configures environment variables that are common to all WebLogic instances on the server.

You can update the JAVA_HOME in the commEnv script, but it will affect ALL the WebLogic instances on that machine. This might be what you are looking for. But, if you run more that one web server you might want to try the next option.

Update the setEnv Script

In each WebLogic instance you create (hr92dmo, hr92dev, etc), the file %PIA_HOMEbinsetEnv will set the configuration that applies only to a specific domain. This is where I prefer to set JAVA_HOME. In the file, you will find a line that says:

@REM JAVA_HOME is set via commEnv.sh, to override set it here.

Simply add this line to set a JAVA_HOME for a specific web server:

set JAVA_HOME=e:javajdk-1.7.0_79

Now, you can patch your Demo environment and test without affecting other web servers on the server.

Update the Windows Service

If you are on Windows and installed a service for your web server, you will need to change the JAVA_HOME value for the service. You could re-create the service but there is an easier way.

Open the Registry Editor (regedit) and navigate to:

HKLM:SYSTEMCurrentControlSetserviceshr92dmo-PIAParameters 

Under this registry folder, you’ll see a Key name “JavaHome”. Update the value’s path to match your new JAVA_HOME. Restart the service for the change to take affect.

Patching Java for WebLogic is pretty simple. The next step (and upcoming blog post) will be to script these changes, and WebLogic patches, so you can automate your web server patching.

Disabling PS_TOKEN with PSEatCookies Filter

As many of you have probably heard, there has been much discussion this year regarding vulnerabilities in PeopleSoft’s PS_TOKEN. The talk all started after a presentation from ERPScan, which basically said that a PeopleSoft node’s password can be gained by brute force against a PS_TOKEN. This would allow someone to generate their own PS_TOKEN for any userid.

Now, Oracle plans to bump up it’s SHA-1 salted encryption up to SHA-2 with PeopleTools 8.55. However, it is probably a long ways out before most of us get to 8.55. And when we do get there, who’s to say how long this new encryption will be considered secure?  One option is to simply disable the PS_TOKEN, and therefore prevent this vulnerability altogether! The problem is, PeopleSoft does not give us the option to disable it.

I decided to come up with a proof of concept for a custom solution to this issue. I wrote a Java servlet filter, called PSEatCookies, that will prevent a PS_TOKEN, or any other Cookie you specify, from being added to the ServletHttpResponse. The basic structure and setup is very similar to the filter delivered in the Kerberos Desktop Single Signon solution. I have added the java source, classes and an example web.xml entry to a GitHub repository. You can download it and follow the instructions for setup in the readme file here: https://github.com/psadmin-io/ps-eat-cookies.

I can see this filter being handy when you have a web server located in your DMZ for a single PeopleSoft application. This way you can turn on this filter without impact to your internal users, who most likely would need their PS_TOKEN to jump between multiple applications. Otherwise, you would have to really build this out with special rules and logic, or purchase a third-party product that allows for more configuration.

If you find any problems, have ideas for enhancements or just have a question, feel free to open an issue on GitHub!

Note: This post originally appeared at kylebenson.com