As an admin, creating and testing new software with virtual machines has made our jobs easier. Using VirtualBox and your computer, we can set up a VM and test anything. With the PeopleSoft Images, we can quickly set up a new demo environment and test new features.
While setting up new virtual machines is easy, it does require many steps like downloading the base image, setting up users, installing software and more. Getting the same base virtual machine every time requires attention to detail and doing the same steps, over and over.
Vagrant
Vagrant is a tool that creates the same virtual machine for you every time. You can use Vagrant to create your own VM, or use someone elses VM. Vagrant also simplifies the creation and management of virtual machines on your computer. Here is an example of how to use Vagrant to start a new Puppet Enterprise server on Centos 6:
vagrant init puppetlabs/centos-6.6-64-puppet
vagrant up
That’s it!
The first command tells Vagrant that we want to create an image from the template puppetlabs/centos-6.6-64-puppet from Puppet Labs. The second command tell Vagrant to start the VM. The vagrant up command will download the base virtual machine file from Vagrant’s Atlas site, start the image in VirtualBox, and do any server configuration once the VM starts.
Providers
Vagrant is a front end to VirtualBox, but it will also work with VMWare, Hyper-V, Amazon Web Services, Docker and more. Using different providers is pretty easy (AWS takes a little more setup), and Vagrant handles each providers system for you. We only worry about our Vagrant configuration, not the platform our virtual machines are running on. For this post, and others, we’ll stick to VirtualBox since it’s a free option and works on multiple operating systems.
Atlas
Atlas is service from Vagrant were you can find virtual machine templates created by community members. On Atlas you can search for an OS or software and find virtual machines that people have created. Some of the popular virtual machines are:
hashicorp/precise64– Ubuntu 12.04 TLS 64-bitcentos/7– Centos 7 64-bitpuppetlabs/centos-6.6-64-puppet– Puppet Enterprise on Centos 6.6.64mwrock/Windows2012R2– Windows 2012 R2 (Evaluation License – 180 days)
Install Vagrant
The first step to using Vagrant is to install the latest build. Go to the Vagrant Downloads page and grab the installer for your platform. Download the installer and run it.
Next we need VirtualBox installed. If you already have it installed, take this time to upgrade to the lastest version. You can download the latest version of VirtualBox here.
Create a Virtual Machine
Now we can use Vagrant to create a new virtual machine. Open a command prompt and navigate to the folder where you want to store the virtual machine.
cd ~/VirtualBox VMs/
Next, create a new folder to hold our first virtual machine:
mkdir elastic_test
cd elastic_test
We’ll use the centos/7 base image for our test.
vagrant init centos/7
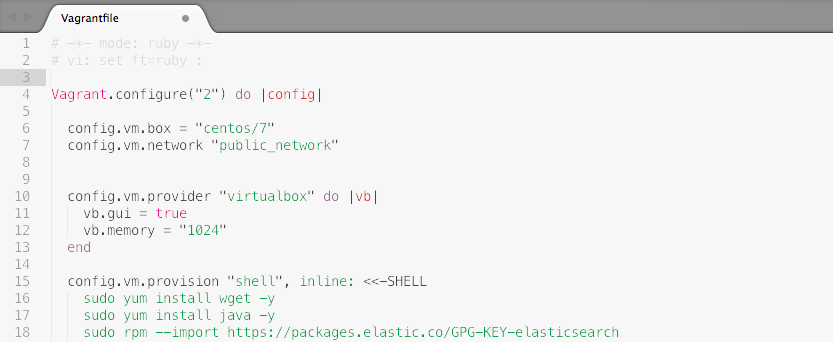
The init command will create a new file in the folder: Vagrantfile. The Vagrantfile tell Vagrant how to configure the virtual machine. We use this file to give the VM a name, how much memory to use, what networking type, and more. We’ll come back to file later.
The next step is to start the virtual machine.
vagrant up
The up command does a few things:
- Checks to see if you have VM on the system
- If not, download the image from Atlas
- Start the VM in VirtualBox (headless VM)
- Configure port forwarding and connect to the VM with SSH
- Set up the Vagrant share
- Run any provisioning scripts in the VM
That one command handles a lot of work for us. Let’s look at some of the key steps.
vagrant Shared Folder
By default, Vagrant will share the folder where you create the virtual machine as /vagrant inside the VM. This share is convenient but is also important for Vagrant provisioning. Script inside the folder, in our case elastic_test, are accessible in the VM. We can configure different folders to share as well. In Vagrantfile, uncomment and modify `
config.vm.synced_folder "../data", "/vagrant_data"
to point to the folder on your host you want to share. The next time you start the virtual machine the share will be configured.
Vagrant ssh
For Linux virtual machines, SSH is configured when the VM is created. To access the virtual machine via SSH, use
vagrant ssh
You can use traditional ssh commands, but using vagrant ssh will use pre-configured SSH keys and log you into the VM.
Port Forwarding and Networking
By default, Vagrant will set up the virtual machine to use a private IP address. This means you can only access the VM from the host machine. When the VM is created, port 2222 is configured to forward requests to port 22 (for SSH). vagrant ssh knows this, so it connects to localhost:2222 when you connect to the VM. To change the networking configuration so anyone on your network can access the VM, update this line in Vagrantfile:
config.vm.network "public_network"
Vagrant will create a second network adapter that grabs a public IP from your networks DHCP server.
Memory and More
The last change we’ll make to the virtual machine is setting the memory and enabling the GUI. When Vagrant starts a Linux VM, it starts a Headless session (no GUI window). If you are comfortable with SSH and command lines this won’t be an issue. If you want to see the VM window in VirtualBox, we’ll update the Vagrantfile to show the GUI.
  config.vm.provider "virtualbox" do |vb|
    # Display the VirtualBox GUI when booting the machine
    vb.gui = true

    # Customize the amount of memory on the VM:
    vb.memory = "1024"
  end
For Windows virtual machines, except Windows Server Core/Nano, the GUI will display by default.
Restart, Shutdown and Delete VM’s
To restart or stop a virtual machine created by Vagrant, we use these commands:
- Restart:
vagrant reload - Shutdown:
vagrant halt
If you are done with the virtual machine and want it removed from your system, use:
vagrant destroy
Provisioning
Those are the basics to using Vagrant. Once you spend a few minutes working with Vagrant, it is hard to go back to creating virtual machines by hand. But quickly creating VM’s is only one benefit of Vagrant. Vagrant has an excellent provisioning mechanism, which means you can create the same VM every time.
Let’s install Elasticsearch in our virtual machine. In the Vagrantfile, find the section config.vm.provision and update it:
config.vm.provision "shell", inline: <<-SHELL
  sudo yum install wget -y
  sudo yum install java -y
  sudo rpm --import https://packages.elastic.co/GPG-KEY-elasticsearch
  sudo wget https://gist.githubusercontent.com/iversond/a5d8985657a9a6c4332dd9a776bd195a/raw/88d3b1b3eb14a4f638ce07473550d108287e4e7e/yum-elasticsearch.repo -O /etc/yum.repos.d/elasticsearch.repo
  sudo yum install elasticsearch -y
  sudo systemctl daemon-reload
  sudo systemctl enable elasticsearch.service
  sudo systemctl start elasticsearch.service
SHELL
Vagrant will run the provisioning script the first time a virtual machine is created, but we can re-run provisioning at any time. Run the command:
vagrant provision
After the provisioning scripts run, log into the virtual machine and check if Elasticsearch is running.
vagrant SSH
curl -X GET http://localhost:9200/
If Elasticsearch installed correctly, you’ll see a response like this:
{
  "name" : "Talia Josephine Wagner",
  "cluster_name" : "elasticsearch",
  "cluster_uuid" : "x1W8bOqBTEy8rdR0P6VUwg",
  "version" : {
    "number" : "2.4.1",
    "build_hash" : "c67dc32e24162035d18d6fe1e952c4cbcbe79d16",
    "build_timestamp" : "2016-09-27T18:57:55Z",
    "build_snapshot" : false,
    "lucene_version" : "5.5.2"
  },
  "tagline" : "You Know, for Search"
}
Disposable and Consistent VM’s
Let’s say we messed up our VM by accidentally running a bad command, or updated some software that messed up our configuration. For example:
rm -rf / --no-preserve-root
Now our virtual machine is broken. Let’s use Vagrant to delete and recreate our VM. We should have the same VM we had before we “accidentally” ran that command.
First step is to shutdown and remove the virtual machine:
vagrant halt
vagrant destroy
If you look at the directory where Vagrant stored the virtual machine, you’ll see the Vagrantfile still exists, but the virtual machine files are gone. Now let’s recreate our virtual machine:
vagrant up
SSH into our rebuilt VM and test Elasticsearch:
vagrant ssh
curl -X GET http://localhost:9200/
That was easy 🙂 We build, broke, removed and rebuilt a virtual machine with a few commands. If you want to build more complex machines (think DPKs), Vagrant supports Puppet, Ansible and more for provisioning.
Pingback: #51 – Elastic{on}