Recently, I created a new Oracle Cloud Infrastructure environment and decided to document the steps I went through to go from a brand-new tenancy to a functioning PeopleSoft environment. These blog posts can service as a guide for administrators who are new to OCI, or for experienced administrators who want to look at a different way to build and manage their tenancy.
I’m taking a Terraform-first approach to building the tenancy, and strive to have the bare minimum manual steps when building objects in the cloud. I want to leverage infrastructure-as-code and automation every place we can so this setup can be replicated by anyone.
If you want to follow along, you can use an existing tenancy and build everything in a separate domain or compartment so it doesn’t interfere with any existing setup. Or, you can sign up for your own test OCI tenancy and start from scratch just like me.
If you want to follow along, you can sign up for an OCI tenancy here and get $300 in free credits, plus access to the Always-free resources. Once you have created your new tenancy and logged in, you can follow along.
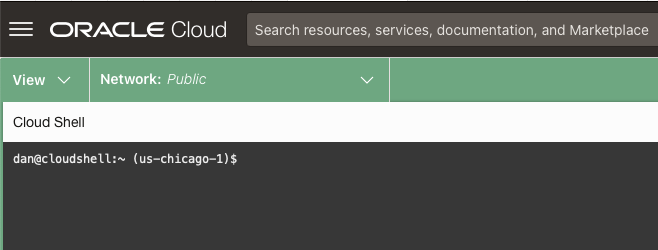
OCI Cloud Shell
All of the configuration and setup for this tenancy will be done using Terraform (and the OCI Command Line, or OCI-CLI, if needed). These are command-line tools that require a little setup and configuration to use. To make life easier, we can use the OCI Cloud Shell that is included with OCI. The Cloud Shell has both the OCI-CLI and Terraform installed and is pre-configured for our tenancy.
To access the Cloud Shell, click the on Developer Tools icon in the header and select “Cloud Shell”

The first time you launch the Cloud Shell, you are prompted to take a tour of its features. If you aren’t familiar with it, go ahead and take the tour. If you want to take the tutorial later, you can start a Cloud Shell and use the command cstutorial to start it.
Let’s run a quick test in our new Cloud Shell by checking our availability domains in the new tenancy.
$ oci iam availability-domain list
{
  "data": [
    {
      "compartment-id": "ocid1.tenancy.oc1..xxxx",
      "id": "ocid1.availabilitydomain.oc1..xxxx",
      "name": "xxxx:US-CHICAGO-1-AD-1"
    },
    {
      "compartment-id": "ocid1.tenancy.oc1..xxxx",
      "id": "ocid1.availabilitydomain.oc1..xxxx",
      "name": "xxxx:US-CHICAGO-1-AD-2"
    },
    {
      "compartment-id": "ocid1.tenancy.oc1..xxxx",
      "id": "ocid1.availabilitydomain.oc1..xxxx",
      "name": "xxx:US-CHICAGO-1-AD-3"
    }
  ]
}
You should see the Availability Domains assigned to your tenancy. The OCI-CLI requires authentication to connect to your account, and the Cloud Shell pre-configures that access so you can get started quickly. Cloud Shell uses “InstancePrincipal” authentication to connect to the tenancy.
$ oci setup autocomplete
To set up autocomplete, we would update few lines in rc/bash_profile file.

===> Enter a path to an rc file to update (file will be created if it does not exist) (leave blank to use '/home/dan/.bashrc'):
Using tab completion script at: /home/oci/lib/oracle-cli/lib64/python3.8/site-packages/oci_cli/bin/oci_autocomplete.sh

We need to add a few lines to your /home/dan/.bashrc file. Please confirm this is ok. [Y/n]: Y

Success!
 Restart your terminal or Run '[[ -e "/home/dan/lib/oci_autocomplete.sh" ]] && source "/home/dan/lib/oci_autocomplete.sh"' for the changes to take effect.
Run the command listed to reload the shell session with autocomplete enabled.
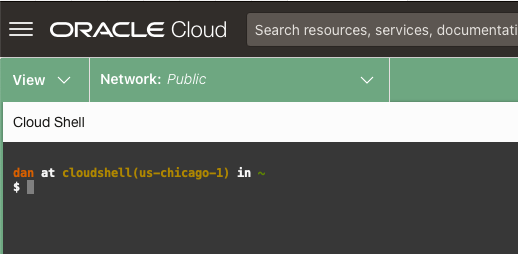
$ [[ -e "/home/dan/lib/oci_autocomplete.sh" ]] && source "/home/dan/lib/oci_autocomplete.sh"The last change I made to the shell is to configure the prompt, or PS1 variable. Copy and paste the command below into your Cloud Shell session.
$ echo "PS1=$'\\[\\033]0;\\W\\007\\]\\[\E[1m\\]\\n\\[\E[38;5;166m\\]\\u\\[\E[97m\\] at \\[\E[38;5;136m\\]cloudshell(\$OCI_REGION)\\[\E[97m\\] in \\[\E[38;5;64m\\]\\w\\n\\[\E[97m\\]$ \\[\E(B\E[m\\]'" | tee -a ~/.bashrc
$ source ~/.bashrc
$ clear
The prompt should now look similar to mine below. I prefer the descriptive language for the prompt, and the colors can be used on remote servers to differentiate production vs. non-production.
Local OCI Command Line
If you don’t want to use the Cloud Shell and run the OCI-CLI and Terraform on your local machine, you can install and configure the OCI Command Line too (oci). The Oracle Docs have a good reference for installing the tool. I’ll be installing the OCI-CLI on my Mac.
$ brew update && brew install oci-cli

$ oci --version
3.33.1
When running the OCI-CLI on your local machine, you have to configure authentication yourself (unlike Cloud Shell which does this for you). There is a handy command with the OCI-CLI that will walk you through the setup. The setup will require a few manual steps in the OCI Console
$ oci setup config
Enter a location for your config [/Users/dan/.oci/config]:
Enter a user OCID:
To get your user accounts OCID (Oracle Cloud ID), you need to log into the OCI Console. Click on your user icon (top-right) and click “My profile”. On the “My profile” page, you can click the “Copy” link for the OCID field.
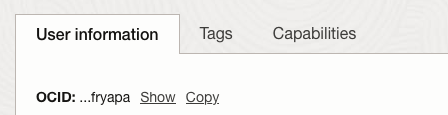
Enter a user OCID: ocid1.user.oc1..xxxx
Enter a tenancy OCID:
To find the Tenancy OCID, click on the user icon (top-right) and click on “Tenancy: xxxx”. Click the “Copy “ link for the OCID field.
Enter a tenancy OCID: ocid1.tenancy.oc1..xxxx
Enter a region by index or name(e.g.
1: af-johannesburg-1 ...):
Enter your home region and generate a new API Signing Key
Enter a region by index or name: us-chicago-1
Do you want to generate a new API Signing RSA key pair? [Y/n]: Y
Enter a directory for your keys to be created [/Users/dan/.oci]:
Enter a name for your key [oci_api_key]:
Public key written to: /Users/dan/.oci/oci_api_key_public.pem
Enter a passphrase for your private key ("N/A" for no passphrase):
Repeat for confirmation:
Private key written to: /Users/dan/.oci/oci_api_key_acedan.pem
Fingerprint: 40:99:xx::xx
Do you want to write your passphrase to the config file? [y/N]: y
Config written to /Users/dan/.oci/config
Before we are done, we have to add our API Public Key to our OCI account. This will allow our OCI-CLI authenticate with our user. Copy the Public key that was generated in the prior step.
$ cat ~/.oci/oci_api_key_public.pem
-----BEGIN PUBLIC KEY-----
MIIBIjANBgxxxx
-----END PUBLIC KEY-----
In the OCI Console, click on the user icon (top-right) and click “My profile”. Select the “API Keys” link, and click “Add API key”. Select the option “Paste a public key” and paste in the contents of the oci_api_key_public.pem Click Add.
The OCI Console will give you a preview of the configuration file you can use to connect. This should already be configured for you by the oci setup configuration command we ran. You can verify the files are the same.
$ cat ~/.oci/config
Now, we can test our locally installed OCI-CLI.
$ oci iam availability-domain list --output table
+-------------------------+------------------------------------+------------------------+
| compartment-id          | id                                 | name                   |
+-------------------------+------------------------------------+------------------------+
| ocid1.tenancy.oc1..xxxx | ocid1.availabilitydomain.oc1..xxxx | xxxx:US-CHICAGO-1-AD-1 |
| ocid1.tenancy.oc1..xxxx | ocid1.availabilitydomain.oc1..xxxx | xxxx:US-CHICAGO-1-AD-2 |
| ocid1.tenancy.oc1..xxxx | ocid1.availabilitydomain.oc1..xxxx | xxxx:US-CHICAGO-1-AD-3 |
+-------------------------+------------------------------------+------------------------+
At this point, we have a working OCI-CLI installation (both locally and in Cloud Shell). Next, we’ll start building resources in our tenancy.