In our fresh tenancy, the first thing we’ll do is connect Terraform. We will use Terraform to build resources as a first option, and a CLI as the second option. This will help enforce an Infrastructure-as-Code deployment.
Before we write any code we need to create a Git repository to track our code. There will be a number of repositories for our tenancy, so I created a parent directory (named after my tenancy) to organize them.
Log into OCI and start a Cloud Shell session. We will create a new Git repository for a sample project called minecraft.
$ echo "export ocitenancy=<your tenancy name>" | tee -a ~/.bashrc
$ source ~/.bashrc
$ mkdir -p ~/repos/$ocitenancy/minecraft
$ cd ~/repos/$ocitenancy/minecraft
$ git init
Since this if the first time we are using Git in our shell, we need to configure our Git Identity.
$ git config --global user.email "you@example.com"
$ git config --global user.name "Your Name"
Next, we create a README file, commit the change, and change the primary branch to main
$ echo "# Minecraft Project" | tee README.md
$ git add .
$ git commit -m "Initial Commit"
$ git branch -m master main
As a way to backup my code, I’ve created a repository on GitHub that I setup as a remote copy. You can clone it and use the repository to follow along. Each post will have a branch that matches the post’s number. (E.g, this post will be saved to branch 02-terraform).
$ git remote add origin https://github.com/ocadmin-io/oci.minecraft.git
$ git push -u origin main
CloudShell Provider Configuration
A Terraform Provider is a backend library that will take the generic Terraform code and apply it to the specific technology. In our case, there is an OCI Provider for Terraform that we can use to create anything in OCI.
First, we will set an environment variable for Terraform to know which OCI Region we are in. Any environment variable that starts with TF_VAR* will be available in Terraform. Add the variables to our .bashrc file so they will always be available when we log in.
$ echo "export TF_VAR_region=$OCI_REGION" | tee -a ~/.bashrc
$ echo "export TF_VAR_tenancy_id=$OCI_TENANCY" | tee -a ~/.bashrc
$ source ~/.bashrc
Create a new file called provider.tf and configure it to use the oci backend.
$ touch provider.tf
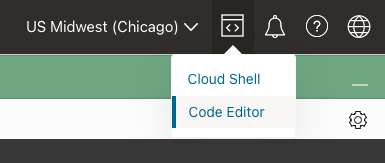
We can edit this file two ways: with vim in the shell, or with the Code Editor feature of the OCI Console. The Code Editor is a web-based Visual Studio Code editor that let’s you work with any file in your Cloud Shell home directory. Launch the Code Editor by click on the “Developer tools” icons and click “Code Editor”.
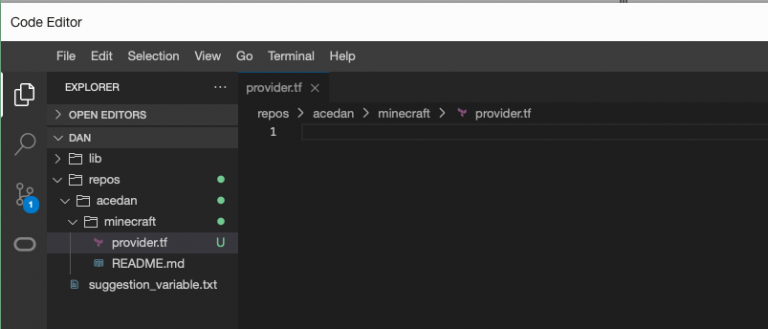
Another window will open in the OCI Console and display the text editor. You can drill down into our repos\$ocitenancy\minecraft folder and see the provider.tf file we created.
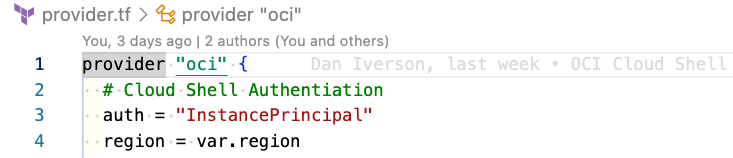
Add the following code to provider.tf so that Terraform will use the InstancePrincipal authentication built into Cloud Shell.
provider "oci" {
    auth = "InstancePrincipal"
    region = var.region
}

variable "region" {}
variable "tenancy_id" {}

data "oci_identity_availability_domains" "ads" {
  compartment_id = var.tenancy_id
}

output "ads" {
  value = data.oci_identity_availability_domains.ads.availability_domains
}
After you save the changes, go back into Cloud Shell and initialize our minecraft project.
$ terraform init

Initializing the backend...

Initializing provider plugins...
- Finding latest version of hashicorp/oci...
- Installing hashicorp/oci v5.11.0...
- Installed hashicorp/oci v5.11.0 (unauthenticated)
Terraform has been successfully initialized!
Initializing will tell Terraform to download any providers we use into the .terraform directory for our project. Next, we can run a plan to see what Terraform will do.
$ terraform plan

data.oci_identity_availability_domains.ads: Reading...
data.oci_identity_availability_domains.ads: Read complete after 0s [id=IdentityAvailabilityDomainsDataSource-42880534]

Changes to Outputs:
  + ads = [
      + {
          + compartment_id = "ocid1.tenancy.oc1..xxxx"
          + id             = "ocid1.availabilitydomain.oc1..xxxx"
          + name           = "xxxx:US-CHICAGO-1-AD-1"
        },
      + {
          + compartment_id = "ocid1.tenancy.oc1..xxxx"
          + id             = "ocid1.availabilitydomain.oc1..xxxx"
          + name           = "xxxx:US-CHICAGO-1-AD-2"
        },
      + {
          + compartment_id = "ocid1.tenancy.oc1..xxxx"
          + id             = "ocid1.availabilitydomain.oc1..xxxx"
          + name           = "xxxx:US-CHICAGO-1-AD-3"
        },
    ]

You can apply this plan to save these new output values to the Terraform state, without changing any real infrastructure.
Normally, after we get a plan from Terraform, we can apply those changes and Terraform will create resources in OCI. But, our code only retrieves some values for us and doesn’t build anything, yet, so there is no need to apply our changes. What we have done is verify our connection between Terraform and our OCI tenancy.
Before we move on, add your changes into the repository and commit them. We will also add the .terraform/* directory to our .gitignore file. The directory stores the provider binaries and we don’t need to include those in our repo.
$ echo ".terraform/**" | tee -a .gitignore
$ echo ".terraform.lock.hcl" | tee -a .gitignore $ git add .
$ git commit -m "OCI Cloud Shell Connection Complete"
$ git push origin main
If you want to store your git provider username and password in the credential helper, you can store them like this.
$ git config --global credential.https://github.com.username <username>
$ git config credential.helper store
$ git push origin main
Password for 'https://</username><username>@github.com':</username>
Once you enter the password, Git will save it into the local credential store in Cloud Shell.
Terraform State
When you create resources using Terraform, Terraform will track the state of those objects so it knows if it needs to create or update any resources. Currently, Terraform is tracking the state locally on the Cloud Shell file system. This is useful if you are testing something, but for anything permanent or in a shared environment, we want to store our state in a secure remote location. The state files can also contain sensitive information like private key data and passwords, so it is best to keep the state files someplace more secure. There are many options for remote state storage including Terraform Cloud and OCI Object Storage.
We will use OCI Object Storage to store our state file, and we will use the OCI-CLI to create an Object Store bucket. There is a bit of a chicken and egg situation here because we need to create the bucket first before we use it to track our state. We will use a script with the OCI-CLI to create our bucket and configure Terrafom to use our OCI credentials to access the bucket.
First, we need to grab the Object Storage namespace for our tenancy. The OCI-CLI will return the data in JSON so we use jq to parse the returned data.
$ namespace=$(oci os ns get | jq -r .data)
$ echo "export TF_VAR_namespace=$namespace" | tee -a ~/.bashrc
$ source ~/.bashrc
Next, we create a new bucket in Object Storage.
$ oci os bucket create --name terraform_state --namespace $namespace --compartment-id $OCI_TENANCY

{
  "data": {
    "compartment-id": "ocid1.tenancy.oc1..xxxx",
        ...
    "name": "terraform_state",
    "namespace": "xxxx",
    "public-access-type": "NoPublicAccess",
    ...
}
We have a bucket created but we need to create credentials to read and write the state files. OCI Object Store is compatible with Amazon’s S3 object store and we will use the S3 state provider with Terraform. Create a new credential and pull the S3 secret values to use with Terraform.
$ read aws_key_id aws_key_value <<< $(oci iam customer-secret-key create --user-id $OCI_CS_USER_OCID --display-name 'terraform-state-rw' --query "data".{"AWS_ACCESS_KEY_ID:\"id\",AWS_SECRET_ACCESS_KEY:\"key\""} | jq -r '.AWS_ACCESS_KEY_ID,.AWS_SECRET_ACCESS_KEY')
In the command, we redirected the credentials into variables so that w can securely handle them. We will add the AWS access credentials to a new file ~/.aws/credentials that Terraform will automatically read.
$ mkdir -p ~/.aws
$ tee ~/.aws/credentials <<EOF >/dev/null
[default]
aws_access_key_id=$aws_key_id
aws_secret_access_key=$aws_key_value
EOF
In the Github repository, I also created a create_bucket.sh script that runs these commands.
Our bucket and credentials to access our bucket have been configured. Now we can update our Terraform provider to use the “s3” storage mechanism for our state files. Add this to the provider.tf file.
variable "namespace" {
  default = ""
}

terraform {
  backend "s3" {}
}
To keep our configuration repeatable, we will set our specific tenancy configuration in a config.s3.tfbackend file. The terraform{} block doesn’t allow variables so you must add your specific namespace and region into the file.
bucket   = "terraform_state"
key      = "minecraft"
region   = "<your region>"
endpoint = "https://<your namespace>.compat.objectstorage.<your region>.oraclecloud.com"
skip_region_validation      = true
skip_credentials_validation = true
skip_metadata_api_check     = true
force_path_style            = true
You can also exclude this file our our Git repo since it contains sensitive information. If you are planning to run your Terraform repo in multiple places, you will need to copy this file to your other servers.
$ echo "*.tfbackend" | tee -a .gitignore
We need to tell Terraform we have a new storage location for our state file.
$ terraform init -backend-config=config.s3.tfbackend

Initializing the backend...

Initializing provider plugins... - Reusing previous version of hashicorp/oci from the dependency lock file - Using previously-installed hashicorp/oci v5.13.0

Terraform has been successfully initialized!
Terraform will now store it’s state files in OCI’s Object Storage in a bucket named “terraform_state”. We can use OCI-CLI to verify the bucket exists.
$ oci os bucket list --compartment-id $OCI_TENANCY

{
  "data": [
    {
      "compartment-id": "ocid1.tenancy.oc1..xxxx",
      "name": "terraform_state",
      "namespace": "xxxx",
      ...
    }
  ]
}
We now have a Terraform provider configured for our OCI tenancy and we are ready to start building resources.
Local Shell Provider Connection
To connect Terraform to OCI on your local computer, we have to change our the provider gets credentials to authenticate. If you installed and configured the OCI-CLI locally, we can re-use the profile that was created when setting up the OCI-CLI. Change your provider.tf file to use the config file instead of InstancePrincipal authentication.
provider "oci" {
  tenancy_ocid = var.tenancy_id
  config_file_profile=var.config_file_profile
}

variable "config_file_profile" {
  default = "DEFAULT"
}
Next, we need to set up the TF_VAR_ environment variables. Unlike in Cloud Shell, where we can pull the values from another environment variable, we can pull the values from our OCI-CLI config file. (The tail -1 is optional, but in my case it pulls in the last profile’s region from the OCI-CLI file since my local shell is configured for more than one OCI tenancy).
echo "export TF_VAR_tenancy_id=$(grep tenancy ~/.oci/config | cut -d '=' -f2 | tail -1)" | tee -a .variables
echo "export TF_VAR_region=$(grep region ~/.oci/config | cut -d '=' -f2 | tail -1)" | tee -a .variables
echo ".variables" | tee -a .gitignore
source .variables
Unlike our Cloud Shell setup, we will need to run the source .variables command each time we run the Terraform code locally. You can add that command to your shell’s RC files if you want it to be automatic.
Before we generate a plan locally, we need to re-initialize our Terraform provider. Because we excluded the .terraform/ directory from our Git repo, initializing will download the correct provider binaries to our machine. This is very useful if you are switching platforms (e.g, Linux or Cloud Shell to Windows or Mac).
$ terraform init

Initializing the backend...

Initializing provider plugins...
- Finding latest version of hashicorp/oci...
- Installing hashicorp/oci v5.13.0...
- Installed hashicorp/oci v5.13.0 (signed by HashiCorp)

Terraform has been successfully initialized!
Now we can run our Terraform code locally and test our OCI connection.
$ terraform plan

401-NotAuthenticated, Failed to verify the HTTP(S) Signature
On my computer, Terraform didn’t play nicely with the encrypted RSA API key generated by the OCI-CLI. While it is best to have the API key encrypted, to make Terraform work with with the OCI-CLI config I generated a clear API key file to use with Terraform. (https://github.com/oracle/terraform-provider-oci/issues/512)
$ openssl rsa -in ~/.oci/oci_api_key.pem -check | tee ~/.oci/oci_api_key_clear.pem
Enter pass phrase for /Users/dan/.oci/oci_api_key.pem:

$ oci setup repair-file-permissions --file /Users/dan/.oci/oci_api_key_clear.pem
Then, update your ~/.oci/config file to change the private_key_file to point to our new _clear.pem file
key_file=/Users/dan/.oci/oci_api_key_clear.pem
Now we can test our Terraform provider again.
$ terraform plan
data.oci_identity_availability_domains.ads: Reading...
data.oci_identity_availability_domains.ads: Read complete after 0s [id=IdentityAvailabilityDomainsDataSource-42880534]

Changes to Outputs:
  + ads = [
      + {
          + compartment_id = "ocid1.tenancy.oc1..xxxx"
          + id             = "ocid1.availabilitydomain.oc1..xxxx"
          + name           = "xxxx:US-CHICAGO-1-AD-1"
        },
      + {
          + compartment_id = "ocid1.tenancy.oc1..xxxx"
          + id             = "ocid1.availabilitydomain.oc1..xxxx"
          + name           = "xxxx:US-CHICAGO-1-AD-2"
        },
      + {
          + compartment_id = "ocid1.tenancy.oc1..xxxx"
          + id             = "ocid1.availabilitydomain.oc1..xxxx"
          + name           = "xxxx:US-CHICAGO-1-AD-3"
        },
    ]