
#341 – PeopleTools Pathway
This week on the podcast, Kyle and Dan about the future pathways to take to make sure you are taking advantage of the PeopleTools platform.… Read More »#341 – PeopleTools Pathway
This week on the podcast, Kyle and Dan about the future pathways to take to make sure you are taking advantage of the PeopleTools platform.… Read More »#341 – PeopleTools Pathway

Now that we have a network in our tenancy, we can start building servers to some fun software. We will continue to use Terraform and… Read More »OCI – 04 – Build Servers
This week on the podcast, Dan shares how he uses Heartbeat to track uptime in PeopleSoft and Kyle discusses the new Password Management features in… Read More »#339 – Uptime Monitoring
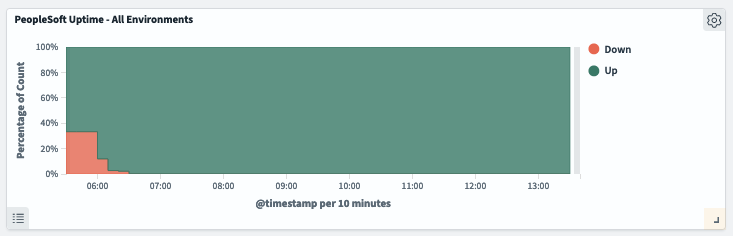
Heartbeat is a lightweight utility from Elasticsearch that can help you monitor the status and uptime of different applications. In our case, we can use… Read More »Monitoring PeopleSoft Uptime with Heartbeat
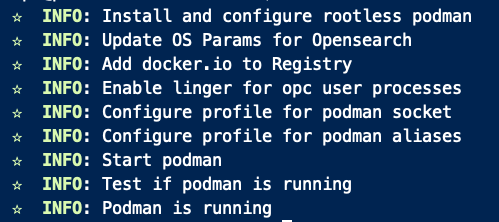
This is one of those blog posts I write for myself because I want it to show up when I Google this the next time.… Read More »Rootless Podman on Oracle Linux
This week on the podcast, Kyle and Dan discuss the PeopleTools 8.61 Planned Features and share what they are excited about in the new release.… Read More »#338 – 8.61 Planned Features
This week on the podcast, Kyle and Dan discuss securing your public user and leaking information, how to speed up change assistant upgrade projects, and… Read More »#337 – ACM and Load Balancers
This week on the podcast, Kyle and Dan talk about the new psadmin.io Themes for 8.60, and then they discuss how they are currently using… Read More »#336 – 8.60 Themes and How we use the DPK
This week on the podcast, Kyle and Dan talk about the changes to the 8.60 database upgrade and the new PPTLS860 project. Dan also shares… Read More »#335 – io_homes DPK Module
This week on the podcast, Dan discusses a new tool he built to simplify CPU patches by using the same tools as the Infrastructure DPK.… Read More »#334 – byop – Bring Your Own Patches – an Infra-DPK Builder