#291 – Mystery Indexes

This week on the podcast, Dan shares his investigation into a mystery index that was crashing his Elasticsearch instances and Kyle and Dan discuss if COBOL is a problem for PeopleTools.

Show Notes


#254 – Vagabond Updates


This week on the podcast, Kyle and Dan discuss Cloud Managers Start/Stop feature, Dan shares some Vagabond project updates, then they discuss the benefits of simple systems.

Show Notes

Speed up PeopleSoft Images

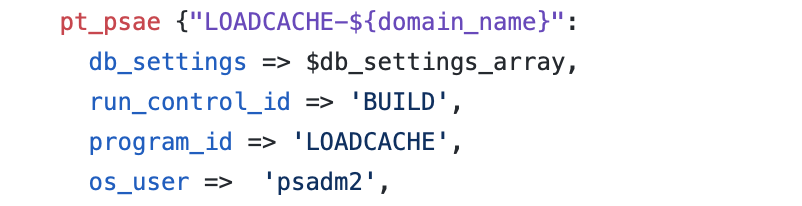
One complaint I have about using PeopleSoft Images is that logging in and opening pages is very slow. Behind the scenes, the application server is caching objects as you request them. The initial cache load can take time and that leads to very slow page loads. To eliminate the cache loading and slow performance, we can run the LOADCACHE process to pre-load all of the application cache.

We will solve this problem using a short Puppet manifest that runs after the DPK is finsihed. This lets the delivered DPK build the system, then we follow along and make the performance improvements.

Before we look at the Puppet code, lets look at the LOADCACHE process and configuration.

LOADCACHE

The LOADCACHE process is an App Engine that will pre-build all of the cache files an application server needs. You run the process from the page “PeopleTools > Utilities > Administration > Load App Server Cache”. Depending on the size of your database, this may take a long time. In my HR Image 32 VM, the process only took 10 minutes. In a large Finance production system, the process ran for 3 hours.

The LOADCACHE process will build the cache files in a directory named CACHE/STAGE/stage. The contents of the stage directory can be copied (or symlinked) to your application server domain. (There is an Output Destination box on the run control page, but it does not control the output location.) The pre-built cache files must be stored under a CACHE/STAGE directory. This directory can live anywhere, but it is easiest to store the cache files under the application server domain.

Last, we need to tell our application server to use the shared cache files instead of per-process cache files. In psappsrv.cfg, set ServerCacheMode=1 and reconfigure the application server.

DPK

The steps we want to automate are this:

  1. Run the LOADCACHE app engine
  2. Create a symlink from app domain to pre-built cache
  3. Change ServerCacheMode in psappsrv.cfg
  4. Reconfigure and start the app server domain

First, the DPK is built to handle multiple app server domains on a box, so let’s wrap our Puppet code in an appropriate loop. Create the file manifests/loadcache.pp:

#loadcache.pp
$appserver_domain_list = hiera('appserver_domain_list')
$appserver_domain_list.each | $domain_name, $app_domain_info | {


}

This code looks up our app server domains in Hiera and will iterate over each domain.

To run an app engine via the DPK, we could use the exec resource and create a command to run. There is a pt_psae custom Puppet Type that the DPK delivers and we can use this to run App Engines. BUT, there is a bug in pt_psae! It is hard-coded to only run PTEM_CONFIG (the ACM App Engine). We can fix that pretty easily. It just so happens that we the pt_psae type takes a program_id parameter and we can use that instead of the hard-coded value.

In the file production/modules/pt_config/lib/puppet/provider/psae.rb, we change the line

ae_program_name="PTEM_CONFIG"

to

ae_program_name=resource[:program_id]

To make this easier, let’s wrap this bug fix into a separate Puppet manifest so we can fix the bug on the fly. Create the file manifests/fixdpkbug.pp

#fixdpkbug.pp
$dpk_location = hiera('dpk_location')

exec { 'fix-dpk-bug':
  command => "sed -i 's/ae_program_name=\"PTEM_CONFIG\"/ae_program_name=resource[:program_id]/' ${dpk_location}/puppet/production/modules/pt_config/lib/puppet/provider/psae.rb",
  path  => '/usr/bin',
}

Back in our loadcache.pp file, we will use the pt_psae type to call the LOADCACHE program. The type requires the database connection credentials that live in the hash db_settings:. We need to convert the hash into an array of key=value pairs first. Then we can populate the parameters for pt_psae.

#loadcache.pp
$ps_home_dir = hiera('ps_home_location')

$appserver_domain_list = hiera('appserver_domain_list')
$appserver_domain_list.each | $domain_name, $app_domain_info | {

  $db_settings = $app_domain_info['db_settings']
  $db_settings_array  = join_keys_to_values($db_settings, '=')
  $ps_cfg_home_dir = $app_domain_info['ps_cfg_home_dir']

  pt_psae {"LOADCACHE-${domain_name}":
    db_settings => $db_settings_array,
    run_control_id => 'BUILD',
    program_id => 'LOADCACHE',
    os_user =>  'psadm2',
    logoutput => 'true',
    ps_home_dir => $ps_home_dir,
  }

}

Next, we need to create the symlink in our app server domain to the location where our CACHE files are created. If you run LOADCACHE through the process scheduler, the files will be built under the PS_FILEDIR specified for the scheduler. Normally, this is stored under the process scheduler domain folder. Since we are running the process through the Puppet Type (aka, command line), it will use the psadm2 user’s PS_FILEDIR location which happens to be /home/psadm2/PS_CACHE.

To create the symlink, we can use the file resource built into Puppet.

#loadcache.pp
$ps_home_dir = hiera('ps_home_location')

$appserver_domain_list = hiera('appserver_domain_list')
$appserver_domain_list.each | $domain_name, $app_domain_info | {

  $db_settings = $app_domain_info['db_settings']
  $db_settings_array  = join_keys_to_values($db_settings, '=')
  $ps_cfg_home_dir = $app_domain_info['ps_cfg_home_dir']

  pt_psae {"LOADCACHE-${domain_name}":
    db_settings => $db_settings_array,
    run_control_id => 'BUILD',
    program_id => 'LOADCACHE',
    os_user =>  'psadm2',
    logoutput => 'true',
    ps_home_dir => $ps_home_dir,
  }
  -> file {"${ps_cfg_home_dir}/appserv/${domain_name}/CACHE/SHARE":
    ensure  => link,
    target  => "/home/psadm2/PS_CACHE/CACHE/STAGE/stage"
  }

}

Notice that we use the -> resource chain between pt_psae and file. This tells puppet that the app engine must run first before we create the symlink (so we know the folder exists).

Next, let’s update psappsrv.cfg to set the Server Cache Mode. For that, we will use an exec resource running the sed command. You could use the file_line resource as well. The file_line method would offer better multi-platform support, but the sed command is really easy to use.

#loadcache.pp
$ps_home_dir = hiera('ps_home_location')

$appserver_domain_list = hiera('appserver_domain_list')
$appserver_domain_list.each | $domain_name, $app_domain_info | {

  $db_settings = $app_domain_info['db_settings']
  $db_settings_array  = join_keys_to_values($db_settings, '=')
  $ps_cfg_home_dir = $app_domain_info['ps_cfg_home_dir']

  pt_psae {"LOADCACHE-${domain_name}":
    db_settings => $db_settings_array,
    run_control_id => 'BUILD',
    program_id => 'LOADCACHE',
    os_user =>  'psadm2',
    logoutput => 'true',
    ps_home_dir => $ps_home_dir,
  }
  -> file {"${ps_cfg_home_dir}/appserv/${domain_name}/CACHE/SHARE":
    ensure  => link,
    target  => "/home/psadm2/PS_CACHE/CACHE/STAGE/stage"
  }
  -> exec { "Set-Cache-Mode-${domain_name}": 
    command => "sed -i 's/^\;ServerCacheMode=0/ServerCacheMode=1/' ${ps_cfg_home_dir}/appserv/${domain_name}/psappsrv.cfg",
    path  => '/usr/bin',
  }

}

Last, we need to reconfigure the domain. I prefer using psadmin plus to handle domain restarts because it can bundle multiple actions into a single command. We can call psadmin plus from Puppet to do our reconfiguration.

#loadcache.pp
$ps_home_dir = hiera('ps_home_location')

$gem_home = '/opt/puppetlabs/puppet/bin'
exec { 'install-psadmin_plus':
  command => "${gem_home}/gem install psadmin_plus",
}

$appserver_domain_list = hiera('appserver_domain_list')
$appserver_domain_list.each | $domain_name, $app_domain_info | {

  $db_settings = $app_domain_info['db_settings']
  $db_settings_array  = join_keys_to_values($db_settings, '=')
  $ps_cfg_home_dir = $app_domain_info['ps_cfg_home_dir']

  pt_psae {"LOADCACHE-${domain_name}":
    db_settings => $db_settings_array,
    run_control_id => 'BUILD',
    program_id => 'LOADCACHE',
    os_user =>  'psadm2',
    logoutput => 'true',
    ps_home_dir => $ps_home_dir,
  }
  -> file {"${ps_cfg_home_dir}/appserv/${domain_name}/CACHE/SHARE":
    ensure  => link,
    target  => "/home/psadm2/PS_CACHE/CACHE/STAGE/stage"
  }
  -> exec { "Set-Cache-Mode-${domain_name}": 
    command => "sed -i 's/^\;ServerCacheMode=0/ServerCacheMode=1/' ${ps_cfg_home_dir}/appserv/${domain_name}/psappsrv.cfg",
    path  => '/usr/bin',
  }
  -> exec { "Bounce ${domain_name} App Domain":
    command => "${gem_home}/psa bounce app ${domain_name}",
    require => Exec['install-psadmin_plus'],
  }
}

Using the exec resource, we can install psadmin plus using the gem utility. Inside our domain loop we can bounce the app server after we build our cache and reconfigure the domain.

The bounce action for psadmin plus will stop the domain, clear cache, flush the IPC resources, reconfigure the domain, then start the domain from a single command.

Running loadcache.pp

We are ready to test our new manifest. We actually have two manifests to test:

  • loadcache.pp
  • fixdpkbug.pp

We need to run the fixdpkbug.pp manifest first. Since that manifest changes a line of the underlying Puppet provider code, we have to run it before we compile the Puppet catalog for our loadcache.pp run. Then, we will run the loadcache.pp manifest.

$ DPK_HOME="/opt/oracle/psft/dpk/puppet"
$ cd $DPK_HOME/production
$ sudo /opt/puppetlabs/puppet/bin/puppet apply manifests/fixdpkbug.pp --confdir $DPK_HOME
Notice: Compiled catalog for psvagabond in environment production in 0.09 seconds
Notice: /Stage[main]/Main/Exec[fix-dpk-bug]/returns: executed successfully
Notice: Applied catalog in 1.91 seconds
$ sudo /opt/puppetlabs/puppet/bin/puppet apply manifests/loadcache.pp --confdir $DPK_HOME
Notice: Compiled catalog for psvagabond in environment production in 0.15 seconds

Notice: /Stage[main]/Main/Exec[install-psadmin_plus]/returns: executed successfully
Notice: /Stage[main]/Main/Pt_psae[LOADCACHE-psftdb]/returns: PeopleTools 8.57.08 - Application Engine
Notice: /Stage[main]/Main/Pt_psae[LOADCACHE-psftdb]/returns: Copyright (c) 1988-2019 Oracle and/or its affiliates.
Notice: /Stage[main]/Main/Pt_psae[LOADCACHE-psftdb]/returns: All Rights Reserved
Notice: /Stage[main]/Main/Pt_psae[LOADCACHE-psftdb]/returns:
Notice: /Stage[main]/Main/Pt_psae[LOADCACHE-psftdb]/returns: Application Engine program LOADCACHE ended normally
Notice: /Stage[main]/Main/Pt_psae[LOADCACHE-psftdb]/returns: executed successfully
Notice: /Stage[main]/Main/Exec[Set-Cache-Mode-psftdb]/returns: executed successfully
Notice: /Stage[main]/Main/Exec[Bounce psftdb App Domain]/returns: executed successfully
Notice: Applied catalog in 594.46 seconds

To verify that your application servers are using the shared cache, open your APPSRV_mmdd.LOG file and look for these lines:

Cache Directory being used: /home/psadm2/psft/pt/8.57/appserv/psftdb/CACHE/SHARE/

When you log into your PeopleSoft Image, all of the pages will load faster than before.

Vagabond and Automated Builds

This change as been added to the ps-vagabond project. If you build your PeopleSoft Images with Vagabond, you can pull down the lastest changes in the master branch. If you want to see how to integrate these manifests into your PeopleSoft Image builds, you can look at this provisioning script.

The two files are shared as Gists in Github, you can freely use them:

UPDATE: I created an Idea for this on the PeopleSoft Idea Space. Go vote for this if you want to see this included in future PeopleSoft Images.

#171 – Web Profiles


This week on the podcast we discuss Event Mapping for App Engines that was teased in a PeopleSoft Talk. Then Kyle shares what learned about Portal Registries and security, and the new Reload Web Profile feature in 8.57.

Show Notes

#77 – Why the Cloud is Important w/ David Bain

This week on the podcast David Bain, Product Manager for PeopleTools, joins us to talk about Fluid, the Cloud and PeopleSoft, and his favorite PeopleTools features. Dan and Kyle also recap some great discussions they had at the Collaborate conference.

Show Notes

  • David Bain Interview
    • Why the cloud is important to PeopleSoft @ 2:00
    • Why Fluid is a better user interface @ 13:00
    • Favorite new PeopleTools feature @ 19:45
    • How PeopleSoft uses PTF internally @ 22:45
    • Favorite PeopleTools feature of all time @ 26:00
  • Recap of David’s Interview @ 28:00
  • Unsexy software features @ 38:00
  • “Hidden” PeopleTools features @ 39:30
  • Interaction Hub @ 45:45
  • Phire and a Testing Module @ 52:30

8.55 – Log Analyzer

The Log Analyzer is a new PeopleTools 8.55 tool that helps you get more information from App Engine trace files. Log Analyzer is specific to analyzing App Engine traces. It feels like a simplified version of TraceMagic (a good thing!). If you have used TraceMagic for PeopleCode, or the Trace2SQL utility to parse .tracesql files, Log Analyzer feels like the two tools combined.

Trace Settings

You need to set the App Engine trace settings to at least these values in the psprcs.cfg file for the Log Analyzer to work:

  • Trace SQL: 3
  • Trace PC: 64

If you are using Config Manager, that translates to these options:

PeopleCode Trace

  • Trace Start of Programs

App Engine Trace

  • Step
  • SQL

Last, you can set them at the process level:

  • -TRACE 3 -TOOLSTRACEPC 64

You can use higher trace values, but these are the minimum for the Log Analyzer to correctly parse your files. Make sure to specify the App Engine SQL trace. If you select the PeopleTools SQL trace, you won’t get an *.AET file when the app engine runs. You can generate a SQL trace (.tracesql) and an App Engine trace (.AET). But at a minimum, you need an *.AET file. Log Analyzer also uses the .TRC PeopleCode trace file.

Log Analyzer GUI

The Log Analyzer tool is a separate java application located under PS_HOME\bin\client\winx86\AELogAnalyzerTool. To launch the tool, run the runTraceAnalyzer.bat batch script. After launching the tool, you’ll see an empty screen. You need to load in an *.AET file.

Screen Shot 2015-12-30 at 1.38.48 PM

Once you load an *.AET trace file, the Log Analyzer will display the heirarchy of the trace program in the lower window. You can expand each section and click on the SQL steps. To view the associated SQL and parameters, click on the “View Details” button. You can also look at the trace in execution order (without the parent/child nesting) by clicking on the “Linearize” button.

Load PeopleCode

If you generate a PeopleCode .TRC trace file, you can import the .TRC file into Log Analyzer. If the trace file has the “Trace Start of Programs” lines (value 64), Log Analyzer will correlate the PeopleCode statements to the app engine step. In the lower window, you can click on the PeopleCode step and view the PeopleCode much like the SQL.

Apply Filters

Log Analyzer has different ways to filter and view your trace file. There are four options to view the different SQL operations: insert, select, update, delete. You can also filter the log output based on a text value, the duration of the step (useful for tuning), or by the number of rows updated.


Log Analyzer feels like a new tool. It functions are still limited (you can filter, but not search), but I think it will be a great tool to add for admins and developers. If you have used TraceMagic, Log Analyzer will be easy to pick up.

VERSION Run Control Options

I have to keep looking this up, so I’m writing it down to make it easier to find next time! There are three modes for the VERSION app engine:

  • Report Mode
    Evaluates the VERSION counters and reports any changes needed; does not change data.
  • Classic Mode
    Resets all the VERSION counters to their starting value (1)
  • Enhanced Mode
    The default mode – it will “advance VERSION counters in a preditable manner” according to Oracle Support.

The name of your run control is how you change the behavior of the VERSION app engine.

  • Report Mode: REPORTONLYxxx – The run control must start with the REPORTONLY value (not case-sensitive)
  • Classic Mode: RESETVERSIONSxxx – The run control must start with the RESETVERSIONS value (not case-sensitive)
  • Enhanced Mode: Any value other than the two above will trigger Enhanced Mode

There is much more to running VERSION, but I’ll save that for another post.

Disabling the App Engine Server

I was having a discussion with another admin recently, and he questioned why we were running our process schedulers with Application Engine Server(PSAESRV) enabled. He pointed out that there is very little gained by running PSAESRV, so why have it turned on?

Now, you aren’t completely without loss in turning this off. Depending on what applications you are running and what your system’s needs are, you will have to make that decision for yourself. Check out Doc ID 651970.1 in MOS for a run down on the pros and cons for each method of running App Engines on your process schedulers.