
This week on the podcast, we share a database migration Oh No! story. Then Dan and Kyle talk about updates to the Vagabond and psadmin-plus projects.
Show Notes
- Oh No! Story @ 1:45
- Vagabond – Windows Support @ 6:00
- psadmin-plus for Windows @ 20:30
This week on the podcast, we share a database migration Oh No! story. Then Dan and Kyle talk about updates to the Vagabond and psadmin-plus projects.
This is a short post, but hopefully helpful. I recently discovered that you can turn on Change Assistant with a debug mode using an environment variable. There is no documentation on this, but it seems to work well and might help you resolve any issues you have with Change Assistant.
To enable the debug mode, set the PSCADBG
environment variable. I used “true” for the value, but any value should work.
$env:PSCADBG="true"
Then launch Change Assistant from the command line:
c:\Program Files\PeopleSoft\Change Assistant\changeassistant.bat
In the command line you should see the debug output, like this:
Signed on to 'PSFTDB'. Using c:\PT8.55.13_Client_ORA\
Attempt to signon using PS/PS@PSFTDB
Controller sending c:\PT8.55.13_Client_ORA client -com.peoplesoft.pt.changeassistant.pshome.request.db.SignOnDatabase
Controller received from c:\PT8.55.13_Client_ORA client -com.peoplesoft.pt.changeassistant.pshome.request.db.SignOnDatabase
Signed on to 'PSFTDB'. Using c:\PT8.55.13_Client_ORA\
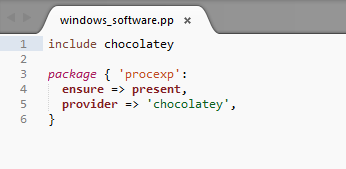
One advantage of Linux distributions is they include software package managers like yum
or apt-get
. Package managers make is easy to install software with a single command, like yum install vlc
. There is a package manager for Windows that works well and integrates with Puppet: Chocolatey. Let’s explore how to use Chocolatey and how it works with Puppet.
Microsoft has a package manager,
OneGet
, butOneGet
new enough that it’s not installed by default in PeopleSoft-certified versions of Windows.
If you want to install Chocolatey with PowerShell, the Chocolatey installation page has example commands to do this. The scripts will download and execute a remotely signed PowerShell script which installs Chocolatey and configures it for you. I used:
iwr https://chocolatey.org/install.ps1 -UseBasicParsing | iex
to install Chocolatey on my server.
After installation, restart your PowerShell window. Installing software with Chocolatey is a simple as running this command:
choco install notepadplusplus
Chocolatey will install Notepad++ for you. Simple!
Want to install git
on your server?
choco install git
Done.
If you want to accept license agreements automatically, run this command to change Chocolatey’s global setting:
choco feature enable -n=allowGlobalConfirmation
I primarily use Chocolatey for server management, but you can use it to manager your workstation too. The library of chocolatey packages contains server and workstation software. To view the library, head over to the chocolatey website.
chocolatey can be used with Puppet to manage software package on your server. There is an official Puppet module for Chocolatey, so we can install the module and use it our own manifests.
puppet module install chocolatey-chocolatey
You may fine the the module install failed due because the Puppet Forge root certificate is not in the Windows keystore. You’ll also notice some warnings about the version number for the pt_xxx
modules. You can ignore those warnings; the version numbers used by the PeopleTools team don’t follow the Puppet conventions.
To install the root certificate for Puppet Forge:
GeoTrustCA.pem
. certutil -v -addstore Root .\GeoTrustCa.pem
to add the certificatepuppet module install chocolatey-chocolatey
The Chocolatey module depends on three additional Puppet libraries, so the installation windows shows you the dependencies it installed.
└─┬ chocolatey-chocolatey
├── badgerious-windows_env
├── puppetlabs-powershell
└── puppetlabs-stdlib
Now we can use Chocolatey in Puppet manfiests. This is great because we can standardize software packages on our servers the same way we standardize configurations.
On my Windows Servers, I use Process Explorer to troubleshoot issues. It’s a free tool from Microsoft and is great for finding processes that are locking access to files. Let’s write a Puppet manifest to install Process Explorer using chocolatey.
On the Chocolatey Packages page, search for “Process Explorer”.
In the results, you’ll see the Chocolatey command to install Process Explorer. Copy the name of the package; we’ll use the name in our manifest.
Create windows_software.pp
under puppet\etc\manifests
. The first line of the manifest will be to include the “Chocolatey” library.
include chocolatey
Then, we need to define a Puppet resource. We use the package
resource, give it the name of the Chocolatey package (from above), and set the ensure
parameter.
package { 'procexp':
ensure => present,
}
Finally, we tell Puppet to use Chocolatey as the package manager.
package { 'procexp':
ensure => present ,
provider => 'chocolatey',
}
Save windows_software.pp
and run puppet apply
:
puppet apply .\windows_software.pp
When the Puppet run is done, you’ll find Process Explorer installed into Chocolatey’s installation directory. The default directory is C:\ProgramData\chocolatey\lib\
.
Update: 9/27/2016
Andy from the psadmin.io Community and podcast episode 42 suggested this tip for using Chocolatey to install git:
choco install -y git -params "/GitAndUnixToolsOnPath"
This will install additional tools like SSH with Git. Thanks Andy!
This week on the podcast, Dan and Kyle talk about PeopleSoft Myths, PowerShell Profiles and more features in Beyond Compare. Then we discuss the “left behind feeling” when hearing what other PS Admin’s are doing.
We want to make this podcast part of the community discussion on PeopleSoft administration. If you have comments, feedback, or topics you’d like us to talk about, we want to hear from you! You can email us at podcast@psadmin.io, tweet us at @psa_io, or use the Twitter hashtag #psadminpodcast.
You can listen to the podcast here on psadmin.io or subscribe with your favorite podcast player using the URL below, or subscribe in iTunes.
I have created a helper menu script to extend the delivered psadmin
program. The script is called psadmin-plus
and I have created a repository for it on psadmin.io’s GitHub account. This was built as a self-study side project while I was on paternity leave this summer. I wanted to learn a little more about bash scripting and how to use git, and at the same time try to make a useful tool for myself and others to use. As of this writing, the tool is usable but far from complete. At the moment it only has support for Linux. I hope to make improvements over time and would invite others to summit issues on GitHub for questions, bugs or enhancement ideas. If anyone wants to contribute themselves, that would be great too!
There are two main uses for psadmin-plus
. The first is actually calling the delivered psadmin
program. The value add here is that it will auto-discover all your PS_CFG_HOME
directories for you and source environment variables as needed. This all assumes you follow a few conventions, which should be documented in the GitHub readme or wiki pages. As mentioned in a previous blog post, this is useful if you use a single user to run your PeopleSoft environments. If you have a different user for each environment and source at login, then this feature doesn’t really help.
The second use is executing actions against multiple PS_CFG_HOME
s and domains at once. An example would be to stop all Process Scheduler domains on a machine. With this tool, you can do this with a few key strokes. You also have the option to execute now or later. If you select later, a script will generate to file. This allows you to run at a future time, maybe during a maintenance window. Again, there are a few assumed conventions that must be followed.
If you want to try it out for yourself, I have created a setup script to run against a PeopleSoft Image(VBox or Linux DPK install only). This will create a few extra PS_CFG_HOMEs
and domains for you to play with in the menu. You can find instructions in the GitHub readme.
Below is a quick demo of psadmin-plus
in use. For more information please see GitHub.
In December, we talked quite a bit about patching Java and WebLogic on the blog and podcast. There was a WebLogic CVE, and then a patch, to apply. If you want a recap on the CVE and patching process, here are the posts:
While applying the patches, I wanted to script the process so patching would be consistent across all our servers. I pulled the scripts into a GitHub project for sharing and reuse. If you haven’t scripted a WebLogic patch, this would be a place to start. The scripts use PowerShell and built for WebLogic 10.3.6. So, they use SmartUpdate instead of OPatch. I also added in a Java patch to the process too. You could pull out the Java patch script to use by itself. One more note: all the patches, Java, and scripts were set to run from the folder e:\installers\weblogic1036-2015-CVE-Patches
. If you use these for your environment, or just use them as a template, you’ll want to update those paths for your specific configuration.
There is nothing ground-breaking about these scripts 🙂 I can write scripts, but I’m not the best script developer out there. If you see places where the scripts need improvement, file an issue with the project or submit a pull request! The main goal with this project and post is to get others started with scripting. Scripting, even if the scripts are basic, can benefit administrators. I hope that this quick overview might help someone get started.
These scripts are writtin in PowerShell. If PowerShell scripts are not enabled on the server, run this command to allow PowerShell scripts to run:
set-executionpolicy unrestricted
Install new SmartUpdate version (3.3.0)
installSmartUpdate.ps1
The silent.xml
file is used for a silent install (no prompts). The installation directory is set to e:\oracle
. If you want a different directory, change the value for “BEAHOME”. 1. Stop all web servers running on the server .stopPIAServices.ps1 The script looks for any Windows service that containts “*-PIA” in the name. If you have any WebLogic domains were not created by the
installNTService
script, you may need to shut them down by hand.
Prepare and copy files from the weblogic1036-2015-CVE-Patches
folder
prepareFiles.ps1
This script performs tasks to prepare different files for patching: On our servers, two files needed updates to run the Smart Update utility. registry.xml
needed to remove a reference to Tuxedo; bsu.cmd
needed an increase in memory to the Java Heap. The registry.xml
file also contains a reference to the server where it was installed. The script will change that value based on the new server’s name. The original files are backed up first and a .bkp
extension is added to the file name. The script also copies jdk-1.7.0_79
to our e:\java
folder. If you want the new java version in a different location, you can change the path in the file.
Apply both WebLogic patches The patches we are applying resolve the December 2015 CVE with WebLogic. If you are using these scripts for future patches, you’ll want to update the patch ID’s in the script.
applyWebLogicPatches.ps1
Both patches are applied to WebLogic using the bsu
command. The script assumes your patches are in the folder e:\patches\cve-2015-4852
. NOTE: On one of our servers, the second patch stalled during the “Checking for Conflicts” step. If the script stalls for more than a few minutes, hit Cntl-C
.
Update the JAVA_HOME values
updateJavaVersion.ps1
The JAVA_HOME
value in the setEnv.cmd
script will be updated to the new path. You must update this script for each server. The paths in the script are hard-coded. (The hard coding is an obvious candidate to fix next. Should be able to use the Get-ChildItem cmdlet to find all the setEnv.cmd
files.)
Update Registry value for JAVA_HOME
updateRegistryJavaVersion.ps1
The JAVA_HOME
value in the Registry for each web service will be updated. You must update this script for each server. The paths in the script are hard-coded. (Again, another place for improvement. Need to find a search cmdlet for the Registry. Could look for -PIA
in the service name.)
Start all web servers running on the server.
startPIAServices.ps1
Again, this looks for all Windows services that have *-PIA
in the name and starts them. That’s it.
The scripts are pretty simple, and you can write a wrapper script to run all the sub-scripts. That way you’d have one script to kick off. Or, you could add these into a tool like Rundeck to execute from a centralized place. Once you start down the path of scripting, many opportunities open up to speed up everyday tasks.